 Login as

Facebook’s dynamic ads make it possible for you to deliver dynamic advertisements by using data feeds just like the Google Shopping campaign ads or dynamic remarketing ads do.
This feature manages not only retargeted delivery that appeals to users about highly relevant products based on their browsing history, but also appeals to those who have not visited your website, so you can expect to increase the new user acquisition if you use this feature skillfully.
I am going to explain how Facebook dynamic ads work, how to create one, and how to set up a target audience to improve your business results.
Contents
- What are Facebook’s dynamic ads?
- The merits of using dynamic ads
- Prepare for creating dynamic ads.
- Create a product catalog.
- Customize and insert your Facebook pixels.
- Create an event code.
- How to customize your Facebook pixel, which you insert in your product details page.
- How to customize your Facebook pixel, which you insert in your cart page.
- How to customize your Facebook pixel, which you insert in your purchase completion page.
- Supplementary information: If you insert an event code on a website that uses an affiliate service provider (ASP) cart
- Verify that customized event codes are operating properly.
- Create an event code.
- How to create a dynamic ad and set up a target audience to improve the results.
- Summary
What are Facebook’s dynamic ads?
Facebook’s dynamic ads are solutions for delivering highly relevant ads with images to target users by creating a link between the product catalog (a product feed in Google Merchant Center) that you upload to Facebook Business Manager and the users’ browsing history/attributes.
User information, such as browsing history, location, age, connection, or interests/concerns, is collected by using the Facebook pixels inserted on your website and the users’ Facebook login information.
Facebook ads are capable of cross-device delivery where targeting by an individual is made possible by users’ login information. For example, targeting the users who browsed your products on their PCs, you can deliver a dynamic ad based on their browsing history at a later date to the news feed on their Facebook app installed on their smartphones.
The merits of using dynamic ads
There are three major merits of using dynamic ads as described below because you can deliver a dynamic ad based on what users have been browsing.
1. You can expect to increase conversion rates.
A dynamic ad tends to increase conversions than a static ad. It attracts the targets to the page of products that are deemed to have high relevance to them.
By directly leading target users to the product page, you can use fewer steps to purchase, and in turn, expect increased conversion rates.
2. The delivery will be more efficient because the Facebook ad auctions can easily recognize your ads as highly relevant.
A dynamic ad can deliver fresh, on-target creatives based on the target users’ browsing history, so Facebook’s ad auctions tend to consider it as highly relevant.
Facebook ads use a metric called “total value score,” and this metric is calculated by taking an advertiser bid, ad quality and relevance, and an estimated action rate into account, so if an ad has a high relevance, you can secure a delivery volume even with a lower bid price. This is one of the merits that a dynamic ad is a delivery-efficient ad compared to a conventional link ad.
* Reference: Showing Relevance Scores for Ads on Facebook | Facebook for Business
3. You can decrease the effort for producing creatives.
If you create an ad once, you can advertise many (very many, depending on the business) products, so you can save far more time in producing creatives than in creating a link ad.
It is not realistic to produce a creative according to each user in normal link ads, but in dynamic ads, this is possible with a small amount of work.
Prepare for creating dynamic ads.
To create a dynamic ad, you need to prepare two things below.
- Create a product catalog that your ads need for including the product information.
- Customize and insert Facebook pixels to track user actions.
Create a product catalog.
A product catalog is a container to hold a product feed (Google Merchant Center also calls one so) where you save the information, such as names, prices, or images of the products you want to advertise.
You first need to create this product feed that is the content of a product catalog.
Create a product feed.
If you are already using Google Shopping ads, you can reuse the product feed on Google Merchant Center as a Facebook product feed.
* In this article, I am going to write about how to create a product feed based on the reuse of the one in Google Merchant Center, so if you have not already done so, create one by following the instructions on the page that the URL below points to.
Reference: Google AdWords Shopping Ads Startup Guide 2016
You need to modify your data when you reuse the Google product feed because:
You need to use English for the line (attribute in Google’s product feed) names on Facebook’s product feed.
You can use Japanese for the line (attribute) names in a Google product feed; if you do, you need to translate them to English.
Requirements
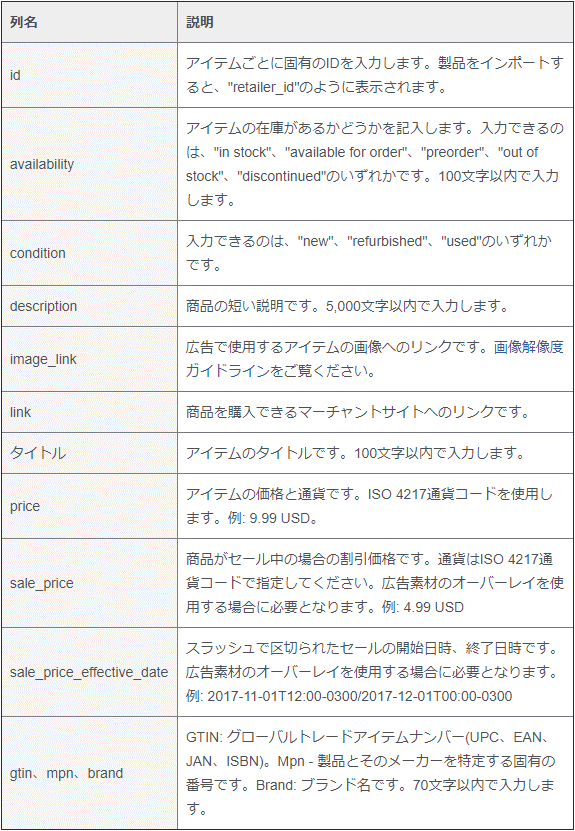
Citation Source: Create a catalog in Business Manager | Facebook Help Center
The information required in Facebook product feeds, as above, is also required in Google product feeds, so basically, all information is already filled in when reusing. One area of difference is that Facebook’s [image_link] requires the image size to be 600 x 600 pixels, compared with Google’s minimum required size 100 x 100 pixels (250 x 250 for fashion), so you need to check the images you are using in your Google product feed.
Source: Recommended image sizes for dynamic ads | Facebook Help Center
Delete tracking parameters.
When you use a tracking parameter with the ad, you need to delete the tracking parameter from the URL in the [link] line.
Upload a product feed.
When you have finished the preparation of a product feed, be sure to upload it and start creating a product catalog.
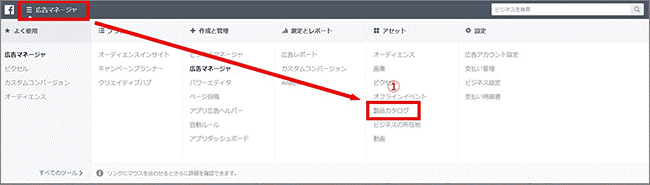
1) Open “Product Catalog” in Ads Manager.
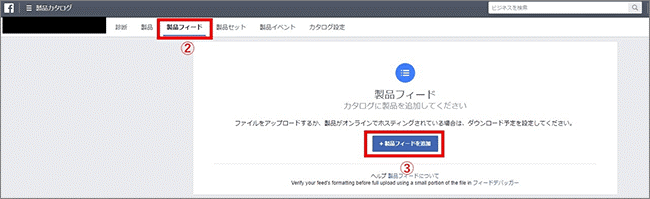
2) Choose “Product Feed.”
3) Click on “Add Product Feed.”
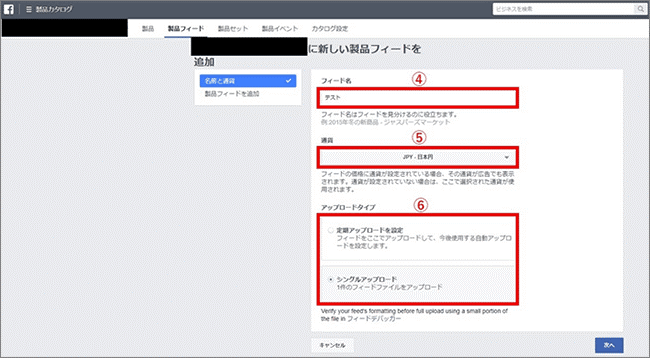
4) Name the feed.
5) Choose your currency.
6) Choose “Single Upload” for the upload type.
* In this article, I assume that the product feed is on a local terminal. If it is saved on an FTP server, for example, choose “Regular Upload” and provide the URL and authentication information.
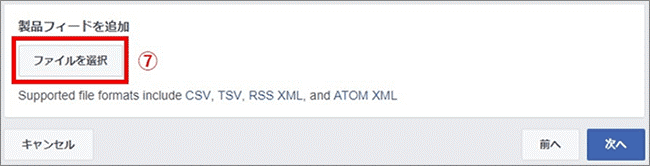
7) Choose the product feed you created by clicking on “File Select” and click on “next.” When the file upload is complete, you are done with the product catalog.
Supplementary information: About product sets
Once you have uploaded your product feed, the creation of the product catalog is complete, but I am going to explain what a product set is for fine-tuning your offering.
If you use a product set, you can create a group of products in the product catalog that match the conditions you set. For example, you can group those products with low profit margins so that you do not deliver in your ads.
Although I will not go into details of settings, a product set can be created by going to “Product Catalog” in Ads Manager and choosing “Product Set,” and you can group products by setting up filters by price or product name.
Customize and insert your Facebook pixels.
A Facebook pixel is a piece of Javascript code you insert on your website to measure and optimize ad delivery.
There are two types in Facebook pixels; one is the base code that you need to insert on all pages of your website, and the other is an event code that you do only on your product page or purchase completion page to measure the on-site user activities.
You must insert an event code to track on-site user activities for dynamic ad rendering because you deliver high-relevance product ads to the users based on their browsing history.
Specifically, you need to insert an event code into the three types of pages below:
- Product details pages
- Cart pages
- Purchase completion pages
In a dynamic ad, the product information, such as the product ID, name, or price, must be obtained from the event code to deliver ads that have the highest relevance within the product catalog. For this purpose, you need to customize the event code so that the product information is dynamically fed.
Summing up, you need to insert the base code and the customized event codes on the three types of pages mentioned above to deliver dynamic ads.
If you already use Facebook ads, you already have inserted the base code, so I will focus on how to customize and insert event codes when delivering dynamic ads.
Create an event code.
First, you need to create an event code.
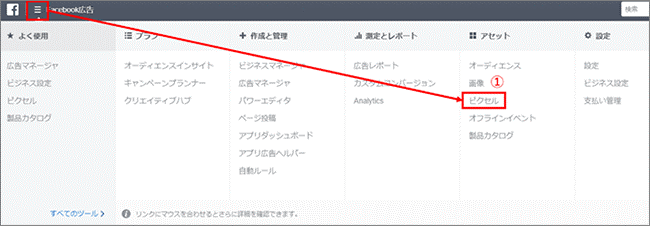
1) Go to Ads Manager and click “Pixel.”
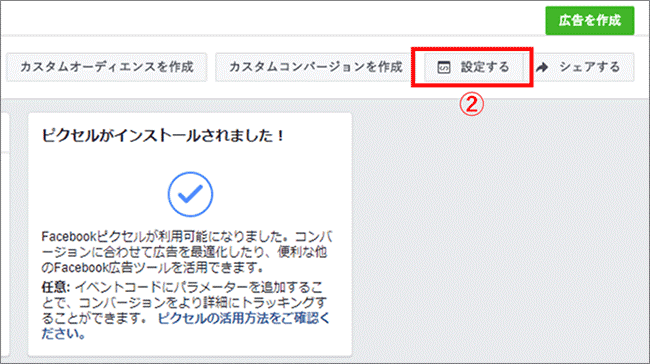
2) Click on “Settings” on the upper right.
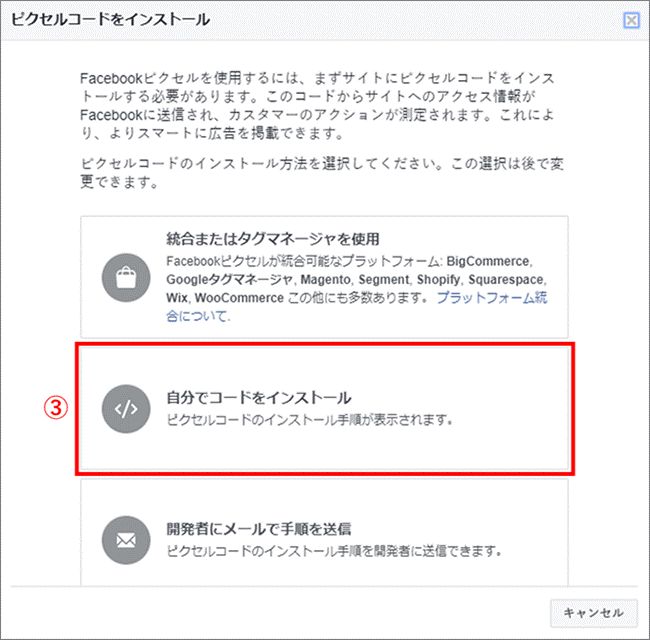
3) Choose “Install the Pixel Yourself.”
Although the page transitions to a new page where you can copy the base code at this point, ignore it and 4) Click on “next;” then, the page goes to another one where you can copy an event code.
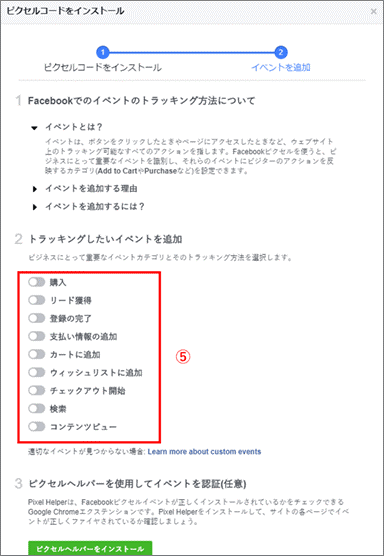
5) Choose an event that you want to track, and you can customize its event code. The event codes you need to customize here are “ViewContent,” “AddToCart,” and “Purchase.”
I will show you how to customize each event code from here.
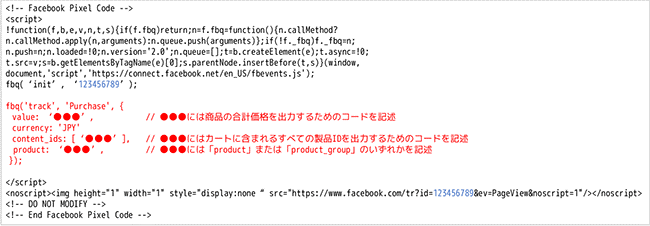
How to customize your Facebook pixel, which you insert in your product details page.
I will explain how to customize the “ViewContent” event code, which you insert in your product details page.
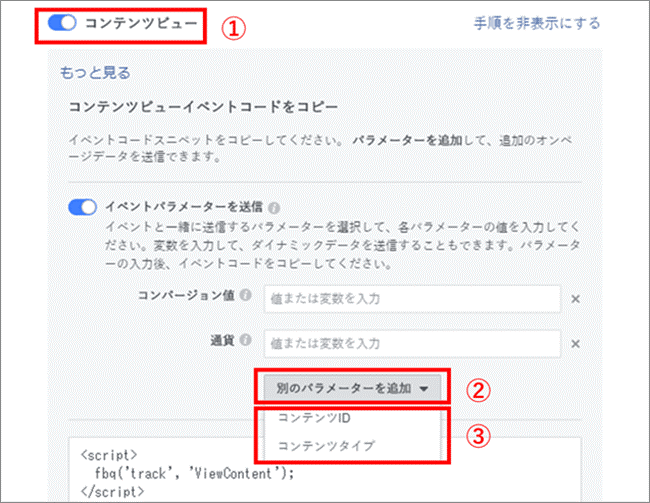
1) Click on “ViewContent”; 2) Click on “Add Event Parameter”; then, 3) Click on “Content ID.” Repeat 2) and 3) and click on “Content Type.”
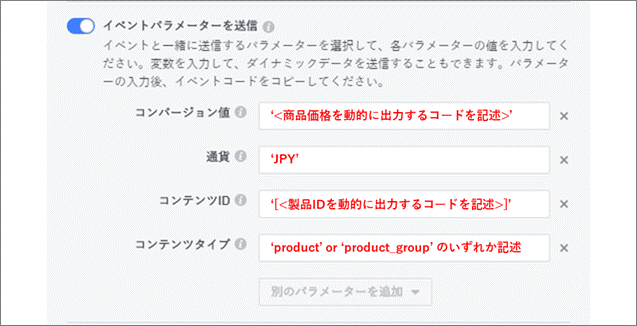
Next, you are going to input your parameters. The details of each parameter are as follows:
- Conversion Value
- You need to write your code so that the product price is dynamically output. The output method is website-dependent, so make sure to check with your server manager about the code you should write. Please note that you need to write it so that the figures are surrounded by a pair of single quotation marks “ ‘ ‘ “.
- Currency
- For the Japanese yen, remember to write ‘JPY’.
- Content ID
- You also need to write your code so that the product ID is dynamically output. Just like the conversion value, don’t forget to check with your server manager about the code you should write. Please take care that you need to surround the product ID by brackets “[]” first and by single quotation marks ” ‘ ‘ “.
- Content Type
- Here, you need to write either a ‘product’ or ‘product_group’ code.
- If you use only the required fields for product feed introduced here, writing a ‘product’ code will be enough. If you have even one entry that has “item_group_id” in your product feed, remind yourself that you need to write a ‘product_group’ code. An “items_group_id” is called “the product group ID” in a product feed in Google Merchant Center.
Mind that you insert the event code customized by following the steps so far below the </head> tag of the product details page or within the base code as shown below.
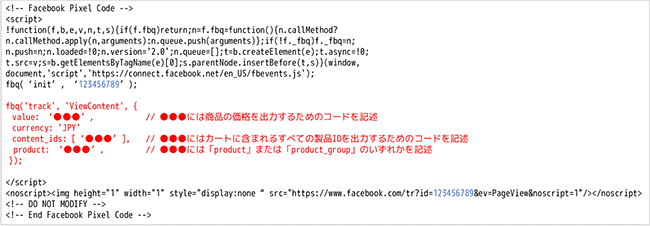
* The part in the color black is the base code, and the part in red is the inserted “ViewContent” code. The part in blue is an individual Facebook pixel ID.
How to customize your Facebook pixel, which you insert in your cart page.
I am going to explain how to customize the “ViewContent” event code, which you put in the cart page.
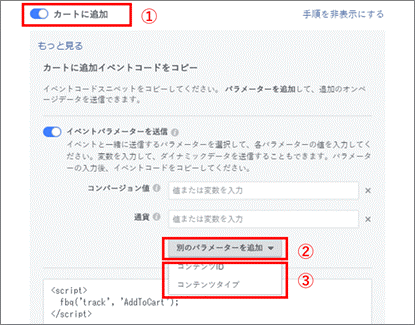
Steps 1) to 3) are the same as those for the product details page.
The coding of an event parameter is also the same as that of the product details page, but you need to take into account the following for conversion value and content ID.
- Conversion Value
- The dynamic output price needs to be the total price of the products in the cart.
- Content ID
- If there are two or more products in a cart, you need to separate product IDs with a comma “,” as in “[‘ABC123’, ‘XYZ789’]” so that all products can be output.
Remember to insert the event code customized by following the steps so far below the </head> tag of a cart page or within the base code as shown below.
* The part in the color black is the base code, and the part in red is the inserted “AddToCart” code. The part in blue is an individual Facebook pixel ID.
How to customize your Facebook pixel, which you insert in your purchase completion page.
Now, I am going to explain how to customize the “Purchase” event code.
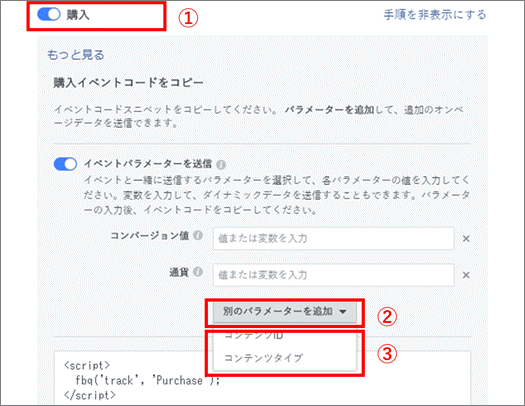
Steps 1) to 3) are the same as those for the product details page.

The coding of an event parameter is also the same as that of the cart page, and for conversion value, you need to output the total price, and if multiple product IDs exist, the content IDs need to be separated by a comma “,”.
After customizing the event code, don’t forget to insert it below the </head> tag of the purchase completion page or within the base code as shown below.
* The part in black is the base code, and the part in red is the inserted “Purchase” code. The part in blue is an individual Facebook pixel ID.
Supplementary information: If you insert an event code on a website that uses an active server page (ASP) cart
An event code needs to output dynamic data, such as product IDs and prices, so if you use an ASP cart, it needs to have a function to dynamically output the data mentioned above.
For example, an ASP cart called “Future Shop 2” can output product IDs dynamically when you code “$GOODS_NO$” where you want to insert the dynamic data. Coding methods are ASP cart-dependent, so be sure to consult each cart manual for details.
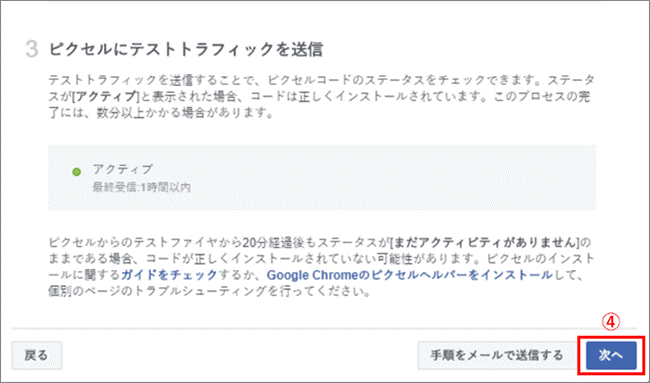
3. Verify that customized event codes are operating properly.
Once you insert your event codes, you need to verify that your Facebook pixels are working correctly.
Facebook offers a Google Chrome extension named “Facebook Pixel Helper,” and I recommend that you use it when you want to check the workings of your Facebook pixels. If you use this extension, you can see whether the figures are correctly passed on to your Facebook pixels.
Reference: Facebook Pixel Helper – Chrome Web Store
How to create a dynamic ad and set up a target audience to improve the results.
I am going to talk about how to create a dynamic ad now that I have discussed how to create a product catalog, install Facebook pixels, and verify that the codes are properly functioning.
Facebook Ads gradually expand the target in many cases in the order of estimated conversion rates from visitors, similar users, and users who seem to be interested in products. Many dynamic ads start with retargeted delivery, but in the official help* it is not recommended to use similar users but a wider range of users by searching demographics when you expand your delivery.
To reach a wider range of targets, you need to set the ad targets based on age, sex, and region. If you have a custom audience for your website, you can include or exclude the visitors to your site or those who took some actions on it. To realize the best performance, I recommend including those who you interacted with on your website and exclude those who recently bought products from your product catalog. I also recommend not using similar audience or target settings based on interests or concerns.
* Citation Source: Dynamic ads | Facebook Help Center
For this reason, I will discuss how to create a dynamic ad in two ways for delivery: by setting a retargeting audience and by using a wider range of targets.
How to create a dynamic ad with retargeted delivery

1) Go to Ads Manager, and click “Create a Campaign.”
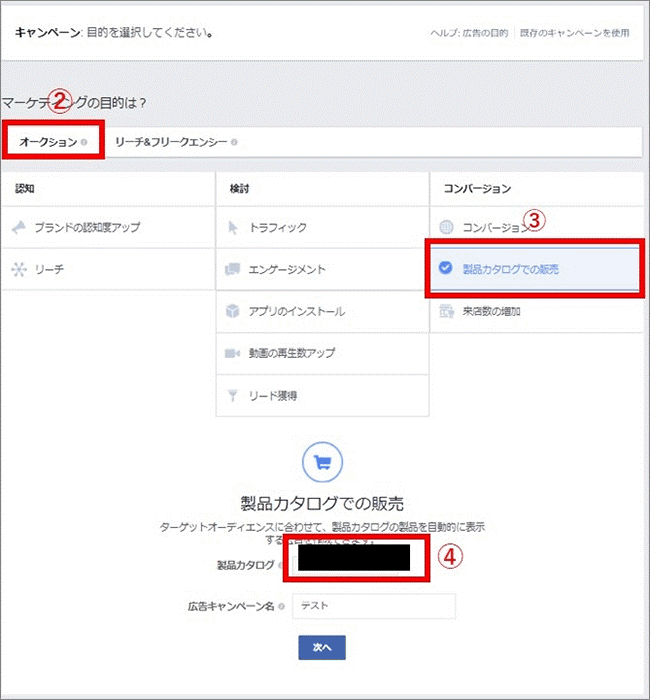
2) Choose “Auction.” 3) Choose “Catalog Sales” for the marketing objective. 4) Choose the product catalog you created, and input a campaign information, and then, click on “Next.”
You will set up an ad set after setting up a campaign.
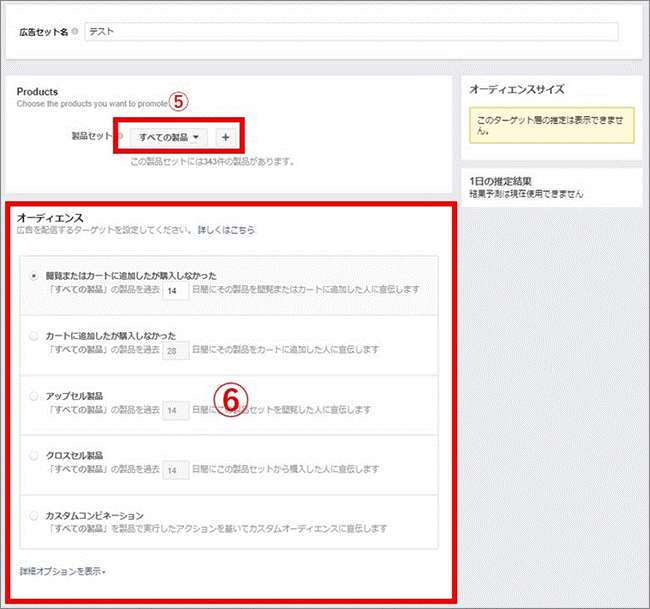
5) Choose either “All Products” or “Product Set” if you already have one. 6) Choose your audience.
From setting up the regions or budgets below, the process is the same as that of a traditional link ad.
In a dynamic ad, you can also test from the retention window that matches the cost-efficiency of link ads, such as choosing visitors without purchase within the past seven days when setting targets for retargeted delivery.
Although I am writing about creating a dynamic ad in the campaign aiming for catalog sales in this article, you can create and deliver one for the campaign aiming for conversions.
Be careful, though, because you can create a dynamic ad in the image or carousel format for the campaigns aiming for catalog sales, but can do so only in the carousel format for campaigns aiming for the rest of the choices of objective.
You can use the cross-sell and up-sell products within the audience mentioned above, but only for the campaigns aiming for catalog sales.
If you choose to cross-sell products, you can recommend other products in ads to those users who purchased your products before. If you manage products with high repeat rates, you can raise the life-time value (LTV) of existing customers.
If you choose to up-sell products, you can display the products with higher profit margins from the same category of the products that the users are interested in based on their browsing history. When you are looking at the ad effectiveness in return on ad spend (ROAS), you may want to raise the unit purchase price per customer; then, this is an effective delivery method.
How to create a dynamic ad in a campaign aiming for other than catalog sales is below.
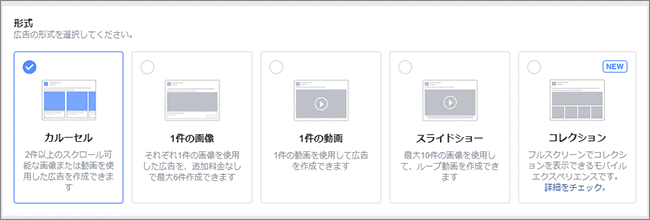
Choose the carousel format on the “Ad Creation” screen.
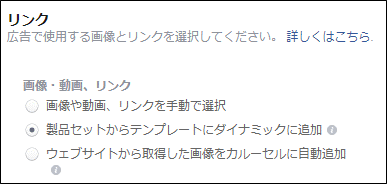
Choose “Dynamically Add to Template from Product Set” from the link choices.
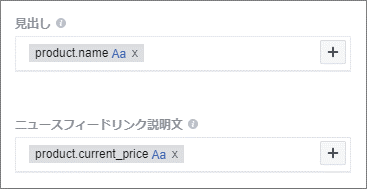
The rest is the same as that of traditional link ads, but in creating a dynamic ad, by adding variables of product information and clicking the “+” mark in the image above, you can reflect the product feed information in titles and news feed link descriptions. These are the variables you want to set because displaying the product names and their prices becomes automatic for the automatically generated product images.
How to set up a dynamic ad for users who have not visited your website by using a wider range of targets.
I will explain how to set up the dynamic ad delivery for the users who have not visited your website next.
With a dynamic ad, you can advertise products that seem to have a high relevance to the users whom you set as the targets in an ad set, based on their browsing history as well as sex, age, or region. You can expect a large impact of a dynamic ad on the expansion of ad delivery in targeting the users who have not visited your website. There are a few points to remember when you set up the targets.
1) Do not set targets by similar audience or interests/concerns. Rather, set them by sex, age, or region to include a wider range of targets.
2) Exclude only those who purchased your products during a certain period in the past. Do not exclude the users who visited your website.
When you want to expand ad delivery to the users who have not visited your website, you usually narrow down the target based on similar audience or interests/concerns and then, exclude those who visited your website from the target to prevent the target from overlapping with the one for retargeted delivery.
In the case of a dynamic ad, however, you intentionally do not exclude the website visitors and use the data in the ad set to make it easier for Facebook to find the users with a higher relevance to the products among a larger target population.
The precision in Facebook ad optimization changes by the relevance between the registered ad and the set target, so including visitors to your website makes it easier to find new users with a higher relevance to your products.
Reference: Optimize Ad Delivery | Facebook Help Center
To create a dynamic ad targeting the users who have not visited your website, the objective of a campaign is set to one other than catalog sales.
* As of early September 2017, you can set only those who visited your website, namely, who took some actions with your product catalog, as the target for a campaign aiming for catalog sales.
Creating a campaign and an ad set is the same as that of non-dynamic ads. I have discussed above how to create a dynamic ad.
Summary
Not limited to the use in Facebook dynamic ads, the opportunities to use data feeds in the area of publisher-managed ads are increasing every year. Because you can deliver more personalized creatives, many advertisers must feel the greatly improved results, especially with the retargeted delivery.
It is not only the retargeted delivery that data feeds are useful. If you correctly create the feeds and properly set up your ad management platforms by learning how each platform works, there are enough possibilities to use data feeds for new user acquisition.
Last, why don’t you try to create a product catalog to use for a Facebook dynamic ad because you can also repurpose it for the collection and canvas format ads launched this year.


;>/img/banner/partner $url=>$index; .png)
No comments yet.